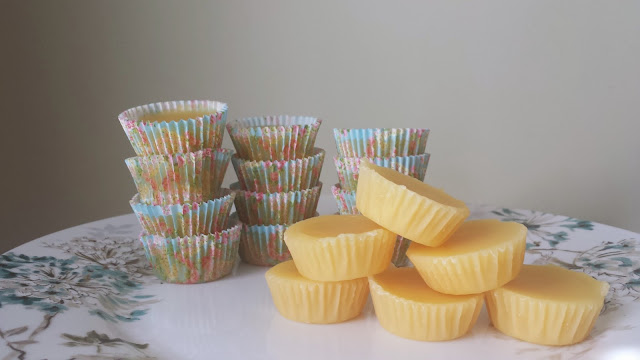
Make Your Own Beeswax Pellets
Beeswax is one of those items that I find so difficult to find in stores. I finally found a health food store that sells beeswax at an affordable price, but they sell it in giant blocks that I have to hack apart with a pair of scissors (trust me, you do NOT want to use your good knives on a block of beeswax). I do recommend buying beeswax online if you can't find it in store, and I have a list of recommended vendors at the end of this blog post.
I paid $12.80 for 1lb of beeswax, which is a pretty good price. However having it in the block is not beneficial for me, especially since I will never use an entire block at once. So, I decided to take my beeswax block and melt it down into usable discs/pellets.
To do so, I used
- 1 lb of beeswax
- Mini Muffin Tin (do NOT use silicone, beeswax will stick)
- Muffin Tin Liners (A MUST unless you want your beeswax to be stuck to your tin)
- Heat-safe Container (I used a beaker with a spout and a handle so I could easily pour it without burning myself or wasting beeswax)
- Double Boiler (not pictured)
Prep Time: 1 hour
WARNING: BEESWAX IS HIGHLY FLAMMABLE!!!!! Please be attentive and watch your beeswax at all times. You do not want to start a fire with beeswax.
I placed my beaker a pot and filled the pot halfway with water. I turned the pot on to high and let the water boil and then placed my block of beeswax in the beaker.
I let it boil until I had a fair amount of beeswax, and then I CAREFULLY poured it out into the lined muffin and set it back in the pot to continue boiling. I did this so I could avoid spilling beeswax in the pot. Also, since I only had one tin, I thought it would be a good idea to fill it up as the wax melted to save time.
I placed the tin in the fridge for the beeswax to cool, which took three to five minutes. In the picture above, you can see the pellets in different stages of cooling. When cooled, the beeswax will be a light to pale yellow, similar to or exactly like what it looked like in the big block.
I removed the disc and the liner from the tin when the beeswax cooled enough to be solid, and allowed it to cool completely before removing the paper liner. I left some of the liners on as I thought that may help preserve freshness.
Each beeswax pellet is roughly four tablespoons worth of beeswax (I measured), so this makes for easy use when DIY-ing with beeswax. This was helpful when making my basic body butter bars, as well as my coconut body bars (coming soon!). Check out those links if you're interested in the tutorials! Also as promised, here are some links for trusted beeswax vendors on Amazon:
I hope this tutorial was helpful for those of you wondering what to do with your giant blocks of beeswax. Cheers to easier DIY-ing!
- xoxo, Jayy


it was not helpful you made cup cake size I ask about pellet size.
ReplyDeleteVery helpful, thanks!
ReplyDeleteI enjoyed this post, thanks for sharing.
ReplyDelete